Showing posts with label Web Services. Show all posts

Tuesday, February 23, 2016

Dependancy Injection With Unity

In Last post I gave you introduction for dependency  Injection.

Here we gonna Use it in real code

First I create MVC project and Add following classes to it.

public interface IUserService
   {
       string GetUserName(string name);
   }
 
public class UserService : IUserService
    {
        public string GetUserName(string name)
        {
            return string.Format("Hello {0}", name);
        }
    } 


Here is my folder structure


Then  I create My MVC UserController and Its View. Code is same as I did in prev post

public class UserController : Controller
   {
       private IUserService _userService;
 
       public UserController(IUserService userService)
       {
           _userService = userService;
       }
       // GET: User
       public ActionResult Index()
       {
           ViewBag.UserMessage = _userService.GetUserName("Dependency Unity");
           return View();
       }
   }

Here is View

@{
    ViewBag.Title = "Index";
}
 
<h2>@ViewBag.UserMessage</h2> 
 
 
 That's all. 

Now I'm gonna install Unity Nuget package for DI framework


 Then real Dependency Injection begins.

Main Focus  
  1. Register
  2. Resolver
 We use dependency Injection Register for register dependency  and resolver for resolve dependency.  It will be done by Unity framework for you if you implement it


1. Create Class DI_Register 

public static class Di_Register
    {
        /// <summary>
        /// Register And resolver of Dependency 
        /// </summary>
        public static void RegisterDependancy()
        {
            IUnityContainer container = new UnityContainer();
            RegisterDependancy(container);
 
            DependencyResolver.SetResolver(new UserResolver(container));
        }
 
        /// <summary>
        /// Type registration
        /// </summary>
        /// <param name="container"></param>
        private static void RegisterDependancy(IUnityContainer container)
        {
            container.RegisterType<IUserServiceUserService>();
        }
    }
 

2. Create UserResolver Class for dependency resolving. It will  using the Unity's IDependancyResolver Interface for resolving implementation . It eill take care of your dependency resolving 


/// <summary>
   /// Resolver 
   /// </summary>
   internal class UserResolver : IDependencyResolver
   {
       private IUnityContainer _unityContainer;
 
       public UserResolver(IUnityContainer unityContainer)
       {
           _unityContainer = unityContainer;
       }
 
       /// <summary>
       /// For one object 
       /// </summary>
       /// <param name="serviceType"></param>
       /// <returns></returns>
       public object GetService(Type serviceType)
       {
           try
           {
               return _unityContainer.Resolve(serviceType);
           }
           catch (Exception)
           {
 
               return null;
           }
       }
 
       /// <summary>
       /// For multiple objects 
       /// </summary>
       /// <param name="serviceType"></param>
       /// <returns></returns>
       public IEnumerable<object> GetServices(Type serviceType)
       {
           try
           {
               return _unityContainer.ResolveAll(serviceType);
 
           }
           catch (Exception)
           {
 
               return null;
           }
       }
   }

 3. Then go to the AppStart (startup.auth.cs) and call dependency register in application bigining

Di_Register.RegisterDependancy(); 


 Then Run and see the magic :)


Full code In Git ..

https://github.com/prabathsl/DI_Sample


 Enjoy Coding


Thursday, January 21, 2016

Web API From Code (Entity frameworkk code first model)

If you going to target mobile based applications to the small business you need to have API/web service on the hand.

Today we are going to develop Web API within few minutes.

Im using entity framework code first model approach here. (You can use same approach with Asp.NET web sites too) 

Advantages of Code first Model
  • All handle in the code. Full control with the code
  • No need to worry about the database

Here is the scenario today im working.

There is DVD rental store. Which each user can get one or more movie dvd's . 


1. Create Asp.NET web API project
2. Then Add the following classes to it in model

TransactionId is auto increment 

/// <summary>
/// User Db Model 
/// </summary>
public class User
{
    public Guid UserId { getset; }
    public string UserName { getset; }
    public string NIC { getset; }
    public DateTime BirthDay { getset; }
 
    //One user may have multiple transactions
    public virtual ICollection<Transaction> Transactions { getset; }
}

/// <summary>
/// Video Db Model
/// </summary>
public class Video
{
    public Guid VideoId { getset; }
    public string VideoName { getset; }
    public string Publisher { getset; }
 
    //One video may have multiple transactions 
    public virtual ICollection<Transaction> Transactions { getset; }
}

/// <summary>
/// Transaction db model
/// </summary>
public class Transaction
{
    [DatabaseGenerated(DatabaseGeneratedOption.Computed)]
    public int TransactionId { getset; }
    public Guid UserId { getset; }
    public Guid VideoId { getset; }
    public DateTime ReserveDate { getset; }
    public DateTime ReturnDate { getset; }
 
    //Add forign key 
    public virtual Video Video { getset; }
    public virtual User User { getset; }
} 

3. Install Entity Framework
4. Create Db Context file (RentalContext)
/// <summary>
/// Database context 
/// </summary>
public class RentalContext:DbContext
{
    public RentalContext():base("RentalContext")
    {
 
    }
 
    /******************Database tables ******************/
    public DbSet<User> UserSet { getset; }
    public DbSet<Video> VideoSet { getset; }
    public DbSet<Transaction> TranactionSet { getset; }
 
    protected override void OnModelCreating(DbModelBuilder modelBuilder)
    {
         base.OnModelCreating(modelBuilder);
    }
}

5. Then create Db initialize to change database when any changes happen with model
***With few sample data

public class RentalInitilizer : DropCreateDatabaseIfModelChanges<RentalContext>
{
    /// <summary>
    /// Add sampe data to the database 
    /// </summary>
    /// <param name="context"></param>
    protected override void Seed(RentalContext context)
    {
        List<User> Users = new List<User>()
        {
            new User(){BirthDay=Convert.ToDateTime("1990-05-03"),NIC="90563247855V",UserId=new Guid("93d82550-eefb-4b08-aab9-aa0cf8f3309f"),UserName="Dummy User1"},
            new User(){BirthDay=Convert.ToDateTime("1990-05-03"),NIC="90563247855V",UserId=new Guid("93d92550-eefb-4b08-aab9-aa0cf8f3309f"),UserName="Dummy User2"},
            new User(){BirthDay=Convert.ToDateTime("1990-05-03"),NIC="90563247855V",UserId=new Guid("93d82550-eefb-4b08-aab9-aa0cf8f3309f"),UserName="Dummy User3"}
 
        };
 
        Users.ForEach(x => context.UserSet.Add(x));
 
        List<Video> Videos = new List<Video>()
        {
            new Video(){Publisher="Publisger 1",VideoId=new Guid("4fb4912c-6f7d-4d34-8fd0-9ec641ae328d"), VideoName="Video 1"},
            new Video(){Publisher="Publisger 2",VideoId=new Guid("bcfc276a-8c41-40ad-bb7b-05731dbfcce5"), VideoName="Video 2"},
            new Video(){Publisher="Publisger 3",VideoId=new Guid("6a95ce93-6b9d-4d29-9bb0-fb69e2bb53bb"), VideoName="Video 6"}
 
        };
        Videos.ForEach(x => context.VideoSet.Add(x));
 
        List<Transaction> Transactions = new List<Transaction>()
        {
            new Transaction(){ReserveDate=DateTime.Now,ReturnDate=DateTime.Now.AddDays(5),UserId= new Guid("93d82550-eefb-4b08-aab9-aa0cf8f3309f"),VideoId=new Guid("6a95ce93-6b9d-4d29-9bb0-fb69e2bb53bb")},
            new Transaction(){ReserveDate=DateTime.Now,ReturnDate=DateTime.Now.AddDays(5),UserId= new Guid("93d82550-eefb-4b08-aab9-aa0cf8f3309f"),VideoId=new Guid("bcfc276a-8c41-40ad-bb7b-05731dbfcce5")}
 
        };
        Transactions.ForEach(x => context.TranactionSet.Add(x));
 
        context.SaveChanges();
        
       base.Seed(context);
    }
}
 

6. Edit the config
Add context to the entity framework
  <entityFramework>
    <defaultConnectionFactory type="System.Data.Entity.Infrastructure.LocalDbConnectionFactory, EntityFramework">
      <parameters>
        <parameter value="mssqllocaldb" />
      </parameters>
    </defaultConnectionFactory>
    <providers>
      <provider invariantName="System.Data.SqlClient" type="System.Data.Entity.SqlServer.SqlProviderServices, EntityFramework.SqlServer" />
    </providers>
    <contexts>
      <context type="SEF_CodeFirst_API.Models.DbModels.RentalContext, SEF_CodeFirst_API">
        <databaseInitializer type="EF_CodeFirst_API.Models.DbModels.RentalInitializer, SEF_CodeFirst_API" />
      </context>
    </contexts>
  </entityFramework>

Add the  Connection string
 <connectionStrings>
    <add name="RentalContext" 
 connectionString="Data Source=(LocalDb)\v11.0;Initial Catalog=Rental;Integrated Security=SSPI;" 
 providerName="System.Data.SqlClient" />
  </connectionStrings>


Then  you have to create Controller's from Entity framework with read write options.. you are in


Enjoy


Tuesday, January 13, 2015

Time Zone clonflictions with Cloud Services .. How to avoid .

There is problems when you are developing applications which based on cloud services. That is , time of your service (servers ) are different than the time that your application. If you are using time stamp based data pulling  from the cloud service you are in big trouble.

Here if two basic solutions that you can use in those scenarios
1. Use UTC (absolute) Time (highly recommended)
2. Change time zone of the server according to the  requirement

Use absolute time you can just do with simple DateTime object.
in C# simply like this
DateTime.UtcNow

Change Time zone of the Server ( Instances of cloud service )
This is the Task that you cannot find lot of documentation
 If you follow following steps You can easily change server time zone ( In azure (cloud) it will randomly create and no one can predict that which instance of the server will run entire service life cycle *Its never happens with cloud) in every running instance once it starting


1. Create batch (*.bat) file with flowing command
tzutil /s "Sri Lanka Standard Time" 
 

Here is time zone reference 

IndexName of Time ZoneTime
000Dateline Standard Time(GMT-12:00) International Date Line West
001Samoa Standard Time(GMT-11:00) Midway Island, Samoa
002Hawaiian Standard Time(GMT-10:00) Hawaii
003Alaskan Standard Time(GMT-09:00) Alaska
004Pacific Standard Time(GMT-08:00) Pacific Time (US and Canada); Tijuana
010Mountain Standard Time(GMT-07:00) Mountain Time (US and Canada)
013Mexico Standard Time 2(GMT-07:00) Chihuahua, La Paz, Mazatlan
015U.S. Mountain Standard Time(GMT-07:00) Arizona
020Central Standard Time(GMT-06:00) Central Time (US and Canada
025Canada Central Standard Time(GMT-06:00) Saskatchewan
030Mexico Standard Time(GMT-06:00) Guadalajara, Mexico City, Monterrey
033Central America Standard Time(GMT-06:00) Central America
035Eastern Standard Time(GMT-05:00) Eastern Time (US and Canada)
040U.S. Eastern Standard Time(GMT-05:00) Indiana (East)
045S.A. Pacific Standard Time(GMT-05:00) Bogota, Lima, Quito
050Atlantic Standard Time(GMT-04:00) Atlantic Time (Canada)
055S.A. Western Standard Time(GMT-04:00) Caracas, La Paz
056Pacific S.A. Standard Time(GMT-04:00) Santiago
060Newfoundland and Labrador Standard Time(GMT-03:30) Newfoundland and Labrador
065E. South America Standard Time(GMT-03:00) Brasilia
070S.A. Eastern Standard Time(GMT-03:00) Buenos Aires, Georgetown
073Greenland Standard Time(GMT-03:00) Greenland
075Mid-Atlantic Standard Time(GMT-02:00) Mid-Atlantic
080Azores Standard Time(GMT-01:00) Azores
083Cape Verde Standard Time(GMT-01:00) Cape Verde Islands
085GMT Standard Time(GMT) Greenwich Mean Time: Dublin, Edinburgh, Lisbon, London
090Greenwich Standard Time(GMT) Casablanca, Monrovia
095Central Europe Standard Time(GMT+01:00) Belgrade, Bratislava, Budapest, Ljubljana, Prague
100Central European Standard Time(GMT+01:00) Sarajevo, Skopje, Warsaw, Zagreb
105Romance Standard Time(GMT+01:00) Brussels, Copenhagen, Madrid, Paris
110W. Europe Standard Time(GMT+01:00) Amsterdam, Berlin, Bern, Rome, Stockholm, Vienna
113W. Central Africa Standard Time(GMT+01:00) West Central Africa
115E. Europe Standard Time(GMT+02:00) Bucharest
120Egypt Standard Time(GMT+02:00) Cairo
125FLE Standard Time(GMT+02:00) Helsinki, Kiev, Riga, Sofia, Tallinn, Vilnius
130GTB Standard Time(GMT+02:00) Athens, Istanbul, Minsk
135Israel Standard Time(GMT+02:00) Jerusalem
140South Africa Standard Time(GMT+02:00) Harare, Pretoria
145Russian Standard Time(GMT+03:00) Moscow, St. Petersburg, Volgograd
150Arab Standard Time(GMT+03:00) Kuwait, Riyadh
155E. Africa Standard Time(GMT+03:00) Nairobi
158Arabic Standard Time(GMT+03:00) Baghdad
160Iran Standard Time(GMT+03:30) Tehran
165Arabian Standard Time(GMT+04:00) Abu Dhabi, Muscat
170Caucasus Standard Time(GMT+04:00) Baku, Tbilisi, Yerevan
175Transitional Islamic State of Afghanistan Standard Time(GMT+04:30) Kabul
180Ekaterinburg Standard Time(GMT+05:00) Ekaterinburg
185West Asia Standard Time(GMT+05:00) Islamabad, Karachi, Tashkent
190India Standard Time(GMT+05:30) Chennai, Kolkata, Mumbai, New Delhi
193Nepal Standard Time(GMT+05:45) Kathmandu
195Central Asia Standard Time(GMT+06:00) Astana, Dhaka
200Sri Lanka Standard Time(GMT+06:00) Sri Jayawardenepura
201N. Central Asia Standard Time(GMT+06:00) Almaty, Novosibirsk
203Myanmar Standard Time(GMT+06:30) Yangon Rangoon
205S.E. Asia Standard Time(GMT+07:00) Bangkok, Hanoi, Jakarta
207North Asia Standard Time(GMT+07:00) Krasnoyarsk
210China Standard Time(GMT+08:00) Beijing, Chongqing, Hong Kong SAR, Urumqi
215Singapore Standard Time(GMT+08:00) Kuala Lumpur, Singapore
220Taipei Standard Time(GMT+08:00) Taipei
225W. Australia Standard Time(GMT+08:00) Perth
227North Asia East Standard Time(GMT+08:00) Irkutsk, Ulaanbaatar
230Korea Standard Time(GMT+09:00) Seoul
235Tokyo Standard Time(GMT+09:00) Osaka, Sapporo, Tokyo
240Yakutsk Standard Time(GMT+09:00) Yakutsk
245A.U.S. Central Standard Time(GMT+09:30) Darwin
250Cen. Australia Standard Time(GMT+09:30) Adelaide
255A.U.S. Eastern Standard Time(GMT+10:00) Canberra, Melbourne, Sydney
260E. Australia Standard Time(GMT+10:00) Brisbane
265Tasmania Standard Time(GMT+10:00) Hobart
270Vladivostok Standard Time(GMT+10:00) Vladivostok
275West Pacific Standard Time(GMT+10:00) Guam, Port Moresby
280Central Pacific Standard Time(GMT+11:00) Magadan, Solomon Islands, New Caledonia
285Fiji Islands Standard Time(GMT+12:00) Fiji Islands, Kamchatka, Marshall Islands
290New Zealand Standard Time(GMT+12:00) Auckland, Wellington
300Tonga Standard Time(GMT+13:00) Nuku'alofa

2. Add it in to the cloud service ( Not to the cloud service project )

*Add it to project which identifies as role (web, worker) by cloud project . In following example You need to add batch file into WebRole1 project


3. Then R-Click on the batch file and select properties from visual studio . In properties under the Advanced change Copy To Output Directory property in to copy always.


4. Then go to the Cloud project and open the ServiceDefinition.csdf file


5. Under WebRole Tag add Start up task as follow .

 <WebRole name="*****" vmsize="Small">
    <Startup>
      <Task commandLine="NameOfBatchFile.bat" executionContext="elevated" taskType="simple"/>
    </Startup> 
     <Sites>
      <Site name="Web">
        <Bindings>
          <Binding name="Endpoint1" endpointName="Endpoint1" />
        </Bindings>
      </Site>
    </Sites>
    <Endpoints>
      <InputEndpoint name="Endpoint1" protocol="http" port="80" />
    </Endpoints>
  </WebRole>


Now it is done ... You free to go with your cloud service


Enjoy 


Wednesday, November 12, 2014

NodeJs web service With MongoDb

NodeJs is one of the powerful Lagrange that can do lot of things in programming world. When size of data become larger most of databases not can handle them efficiently. Therefor it leads to the change of database structure. Relational (SQL) database is not the best solution in most cases. NoSQL (Not Only SQL) databases are the best solution in those situations. One of the best NoSQL databse is MongoDb.

You can follow above hyperlinks to download and configure Nodejs and MongoDb within your local machine. if you having trouble  just comment below..ill update another post about configurations.

With this post I am going to demonstrate how to create REST service with NodeJs and MongoDB

You can use SublimeText as text editor for node js

1 . First create Document in MongoDb Name it and UserDetails

2. Add following Data to that document
/* 0 */
{
    "_id" : ObjectId("54608e50feeb4595a4f09651"),
    "userName" : "Harith",
    "Age" : 25,
    "Expired" : true
}
 
/* 1 */
{
    "_id" : ObjectId("54608ea4feeb4595a4f09652"),
    "userName" : "Jaliya",
    "password" : "123456",
    "Age" : 30
}
 
/* 2 */
{
    "_id" : ObjectId("5461d46dfeeb4595a4f09655"),
    "name" : "Joe Bookreader",
    "address" : {
        "street" : "123 Fake Street",
        "city" : "Faketon",
        "state" : "MA",
        "zip" : "12345"
    }
}
 
/* 3 */
{
    "_id" : ObjectId("54608f20feeb4595a4f09653"),
    "UserId" : "1",
    "address" : {
        "street" : "123 Fake Street",
        "city" : "Faketon",
        "state" : "MA",
        "zip" : "12345"
    }
}


Lets start to create NodeJs REST

First create Javascript file named it as Rest.js

To use MongoDb you need to install flowing npm package by this command
 npm install mongojs

Then add package.json file to the root of the folder and copy this to it

{
  "name""Rest-server",
  "version""0.0.1",
  "private"true,
  "dependencies": {
    "express""3.3.4"
  }
}

Go to CMD and type npm install


Then start to coding real service in Rest,js

1. Import following libraries to the js file
var express = require('express');
var mongojs = require('mongojs');


2. Then create Array to store all data that comes from Mongo Database
var data = [];

3. Lets code REST Like this
// custom package
var app = express();
 
// Array definition to store data
var data = [];
 
// Http Normal get
app.get('/'function (req, res) {
    var db = require('mongojs').connect('mongodb://localhost:27017/DocumentOrDb');
    console.log("Server is in listen1");
    db.collection("UserDetails").find(function (err, docs) {
        data = [];
        docs.forEach(function (item) {
            data.push(item);
        })
    });
 
    console.log("Server end");
    res.send(data);
});

then run the service with cmd node Rest.js


Here is the full code


/*
  Rest Api with MongoDb Database 
  Author : prabathsl
  Copyright © prabathsl 2014
*/
 
// Libraries
var express = require('express');
var mongojs = require('mongojs');
 
// custom package
var app = express();
 
// Array definition to store data
var data = [];
 
// Http Normal get
app.get('/'function (req, res) {
    var db = require('mongojs').connect('mongodb://localhost:27017/DocumentOrDb');
    console.log("Server is in listen1");
    db.collection("SampleBigdata").find(function (err, docs) {
        data = [];
        docs.forEach(function (item) {
            data.push(item);
        })
    });
 
    console.log("Server end");
    res.send(data);
});


 Enjoy :) 


Thursday, November 6, 2014

HttpClient Caching

Is any one of you have an experience on when send http request through http client the response become the same (no change) even your source of the response (server) is updated.

It is the way that default http protocol behaves

By default HttpClient use a cache to store responses that come up with response headers without Cache-Control header. ( Ref: HTTP Header fields)

In a scenario you need to change the cache behavior with HttpClient you can have two options

1. Edit the service (server) to response with relevant cache headers
2. Modify your request headers

Edit the service (server) to response with relevant cache headers

In this model it give two benefits to you
  • A content you will not use again is not stored in the client machine.
  • Other requests can benefit from the cache (when using the same instance of HttpClient).
In your web service go to web.config file and in-side the system.serviceModel add following tag with relevant headers you need


     <client>
      <endpoint address="http://localhost/..." >
        <headers>
          <Cache-Control>no-cache</Cache-Control>
        </headers>
      </endpoint>
    </client>


Modify your request headers

if you don't have the access to the server you can go with this option. Just ad additional header with HttpClient and send the request then response automatically include these headers

HttpClient Client = new HttpClient();
Client.DefaultRequestHeaders.Add("Cache-Control""no-cache");


Now your HttpClient is ready to handle http request with no cache .


here is Cache contol values that provide from W3 with Http headers.

    cache-directive = cache-request-directive
         | cache-response-directive
    cache-request-directive =
           "no-cache"                          
         | "no-store"                          
         | "max-age" "=" delta-seconds         
         | "max-stale" [ "=" delta-seconds ]   
         | "min-fresh" "=" delta-seconds       
         | "no-transform"                      
         | "only-if-cached"                    
         | cache-extension                     
     cache-response-directive =
           "public"                               
         | "private" [ "=" <"> 1#field-name <"> ] 
         | "no-cache" [ "=" <"> 1#field-name <"> ]
         | "no-store"                             
         | "no-transform"                         
         | "must-revalidate"                      
         | "proxy-revalidate"                     
         | "max-age" "=" delta-seconds            
         | "s-maxage" "=" delta-seconds           
         | cache-extension 


 Enjoy the code .. 


Saturday, October 11, 2014

Windows Azure Mobile Authentication Service

Magic with Azure mobile services is easy handling in Authentication for users. It allows you to authenticate users
1. Microsoft Account
2. Facebook Account
3. Twitter Account
4. Google Account
5. Azure Active Directory

What else developer need..

To enable all of those authentications you need to have apps running on those platforms. Url's for creating apps on each service provider is given below (Creating app on your hand *Get the developer manual help according to each technology)

1. Microsoft - https://account.live.com/developers/applications
2. Facebook - https://developers.facebook.com/ (Click on App's menu)
3. Twitter - https://apps.twitter.com/app/new
4. Google - https://console.developers.google.com/project

** In every instance that you create apps use your Azure Mobile Service Url 
HERE is URL for Microsoft Login
for json backend :https://<mobile_service>.azure-mobile.net/login/microsoftaccount
for .NET backend :https://todolist.azure-mobile.net/signin-microsoft


With later posts you can see how to use Azure Active directory

Start from the beginning

1. First login to your Azure portal and go to Mobile Services


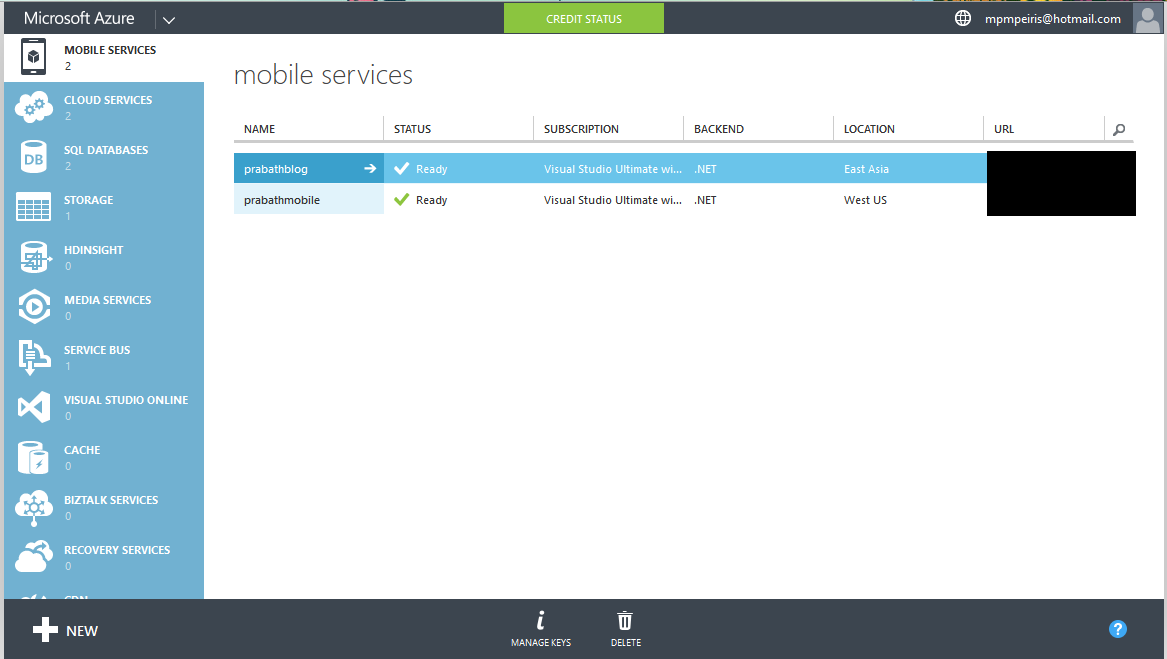
2. Then select your Mobile Service , in here I have already created Mobile Service for the Azure Mobile Services post named as prabathblog. Select it and go inside. Then select IDENTITY  Tab from menu.


3. Fill the values according to the Login provider with details


4. Then go to the dashboard and download the app.

5. Use this code to authenticate in client side

        /// <summary>
        /// Simple authenticate
        /// </summary>
        /// <returns></returns>
        private async Task AuthenticateAsyncSimple()
        {
            while (user == null)
            {
                string message;
                try
                {
                    user = await App.MobileService
                        .LoginAsync(MobileServiceAuthenticationProvider.MicrosoftAccount);
                    message =
                        string.Format("You are now logged in - {0}", user.UserId);
                }
                catch (InvalidOperationException)
                {
                    message = "You must log in. Login Required";
                }
 
                var dialog = new MessageDialog(message);
                dialog.Commands.Add(new UICommand("OK"));
                await dialog.ShowAsync();
            }
        }


Enjoy your code


Saturday, September 13, 2014

Improve Performance of the Application

As and software producer all of us want to do is software product with correct functionality. Is that enough ? No. We need to give product with correct functionality with optimum resource consumption as well.

Today I'm going to tell you some tips and trikes about resource optimization. basically it is about Memory and CPU resources.

1. Switch for multiple If
 When you are using multiple If conditions ( Most of the time more than 2 ) CPU (Registry level) instructions check as far as use much If with code. It consume more registers in CPU. But with switch it just use check and Jump CPU instruction that far more faster than assignments. Using jump tables makes switches much faster than some if-statements

Use switch when ever possible once you find more than two if statements.

2. Use structures according to the situation
Execution of class is much more consume resources than class.  Whenever you don't need to use functions bind with objects and when you don't go with boxing and unboxing much with code.

3. Chunky calls
Don't let your functions to handle lot of task by itself. use modularity to avoid it.

4. Add Collections
Never try to assign collection items one by one to the another collection. Just try to use simple casting and try to add entire collection directly.

5. Working with strings.
When you are working with string most of the cases we try to concatenate string by '+'operator.(including me ). But sad story is there is more optimal solution than that. use string bulider to concatenate strings.

Here for start.

6. Use bits whenever as possible.
I saw most of the programmers use integers/strings to hold the simple states, flags. Please don't do that there is more than 2 states. Just use bit or bool to store states. It will optimize code and resource as well. ( Simply bit is smaller than more bits)

7. Array as possible
When we use simple basic array it will helpful to maintain machine instructions(registry). Other collections need more than array because most of them are derived form it. Array is basic element in modern machine instructions.

8. ObservableCollection vs List
Use List whenever that your items not binded with the UI. Observation collections are derived from List and it also holds the property changed notifications. If there is no use of property change go for List.  ObservableCollection check the property change when it on use and because of that it consume more.

9. For than foreach
Use while, for and do while loops wherever than foreah. foreach has good performance but basic loops are better than it.

10. ToString
Some  programmers use ToString method wherever elements are already strings. Use ToString wherever the element that con the string. don't use ToString as habit. With integers use
ToStringLookup will optimize memory heap that using with converting integer.

11. Don't sort collections already sorted.
Check collection already sorted or not before sort it.

12. Global variables.
Use global variables when you using same type of object frequently

13. Constant and static
Constants are not assignable memories but they are easy to load.

Static is more faster than instant creations. When load statics no need of run time to check the instance


Hope this is helps...


Monday, August 11, 2014

Publish Cloud Services

Lets see how to publish your cloud service to Azure with visual studio. In here I'm going to use same loud service that we build in my previous post Creating Cloud Service.

1. Open your solution in Visual Studio and select your project R-Click and then Publish


2. Then it will prompt Publish Windows Azure Application windows. Then sign in to your Azure Account and select your subscription that you want to use and click Next


3. Then it will gives you Publish Settings form from it if you already have created Cloud service in Azure you can select that service to publish. If not you can create new Service (i'm creating new Service here )


Create new will prompt new window and add name to your service and Select nearest data center for the location.


4. Then you have to select your created service name and Environment to host. In Azure it provide two environment to host your services.
  • Production Environment 
  • Staging Environment
Production Environment contains the actual running application. Production environment is trusted and currently our customers are accessed this environment if we already punished this service and it is up and running.

When we are updating new version of same Service directly to the production environment meanwhile we doing the update our application will not functional. Our users cant access the application. And another hand we don't know that our new version is exactly functioning well within hosted environment. Sometimes there may be bugs.

To avoid those problems Azure provide us concept called Staging Environment if we publish app to the staging environment it will gives us separate URL for the newly published app mean wile our Production environment is up and running. We can verify that our new version is up and running meanwhile  older version will serve our customers. Once we verify that our new version is ready to go its single click away. There is SWAP (VIP Swap) button in azure portal in staging application. It will automatically connect the traffic to Staging application.

What it does is it swap the IP address between selected staging environment and Production. now Our staging is production and production become staging. Its called VIP Swap.

Azure allows you to have maximum 5 staging's per Application


Lets back to subject :)
 In my case im going to publish brand new application and therefore i can directly publish to production environment . but after that if you make new version go with best practices

and I'm using Release binaries and use service configuration file as cloud version. And with enable remote desktop i can loginto VM's that my service web role's is hosted ad username and password if you need remote desktop enabled


With Advanced tab you can define the service hosted storage and configurations as you need.


Then you can publish your Cloud service


Here is my published service URL : http://prabathblogdemo.cloudapp.net/

Here is Some publisher logs and you can understand what is happened when publishing (* My web roles have 2 instances )

6:59:40 PM - Connecting...
6:59:40 PM - Verifying storage account 'portalvhdsjf2mmx92gk60l'...
6:59:41 PM - Uploading Package...
7:02:35 PM - Creating...
7:03:23 PM - Created Deployment ID: XXXXXXXXXXXXXXXX.
7:03:23 PM - Instance 0 of role PrabathslWebRole is stopped
7:03:23 PM - Instance 1 of role PrabathslWebRole is stopped
7:03:24 PM - Starting...
7:03:41 PM - Initializing...
7:03:42 PM - Instance 0 of role PrabathslWebRole is creating the virtual machine
7:03:42 PM - Instance 1 of role PrabathslWebRole is creating the virtual machine
7:04:47 PM - Instance 0 of role PrabathslWebRole is starting the virtual machine
7:04:47 PM - Instance 1 of role PrabathslWebRole is starting the virtual machine
7:06:25 PM - Instance 0 of role PrabathslWebRole is in an unknown state
7:06:25 PM - Instance 1 of role PrabathslWebRole is in an unknown state
7:07:00 PM - Instance 0 of role PrabathslWebRole is busy
7:07:00 PM - Instance 1 of role PrabathslWebRole is busy

7:08:07 PM - Instance 0 of role PrabathslWebRole is ready
7:08:07 PM - Instance 1 of role PrabathslWebRole is ready
7:08:07 PM - Created Website URL: http://prabathblogdemo.cloudapp.net/
7:08:07 PM - Complete.


Hosted App


Here is created instances in Azure Portal


You can connect those Hosted VM's using Connect button via remote desktop using given credentials when you publish app


Enjoy :)